Magic Square
and five pennies
|
Activity 1. A magic square is a square array of consecutive natural numbers, 1, 2, 3, ..., such that the sums of the numbers in each row, in each column, and on both diagonals are the same. Creating magic squares is a very ancient art, and the smallest and best known one is 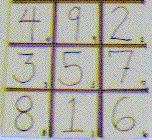
2. Memorizing addition facts, and being able to recall them instantly, is as important now as it ever was. But many methods for teaching addition facts that have been used previously are not acceptable today. One method involving the whole class worked as follows: In this way, in a few minutes every student would answer two or three questions, and everyone was paying attention because he or she could be asked to answer the next question. This kind of "military drill" is not acceptable anymore, but achieving almost automatic computation of sums of small numbers requires a large amount of practice distributed over a long period of time, which is quite a boring activity. 3. The magic square board, described below, is designed to provide practice in addition facts which can be done with the whole class under the teacher's direction. 3.1. Board description 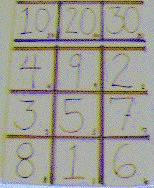 The board is a rectangle, 3 by 4 1/4 inches, made from a 3 by 5 index
card. It is divided into two parts; the lower part is a 3 by 3 magic
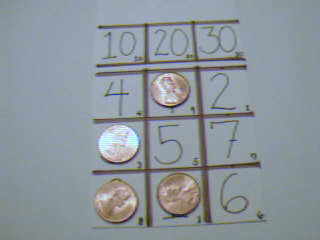
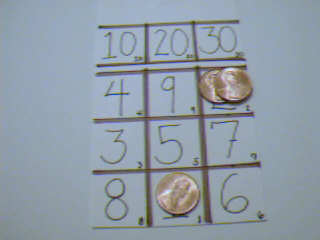
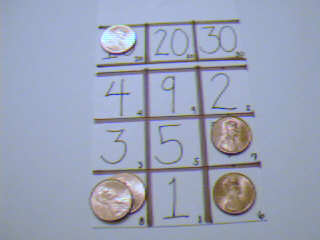
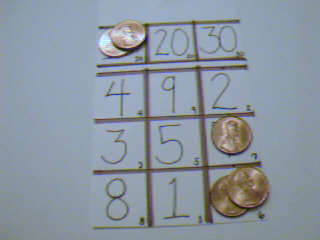
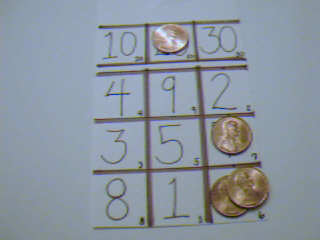
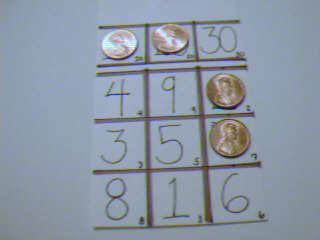
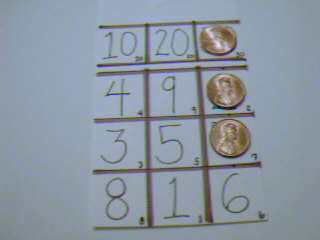
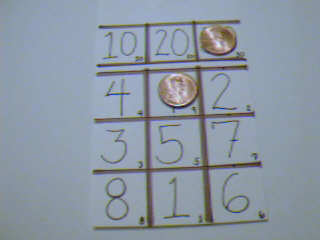
square, and the upper part has three numbers: 10, 20, and 30.
The board is a rectangle, 3 by 4 1/4 inches, made from a 3 by 5 index
card. It is divided into two parts; the lower part is a 3 by 3 magic
square, and the upper part has three numbers: 10, 20, and 30.
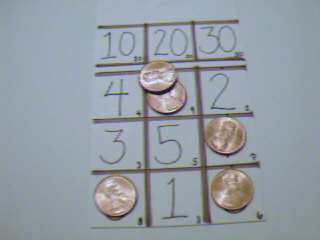
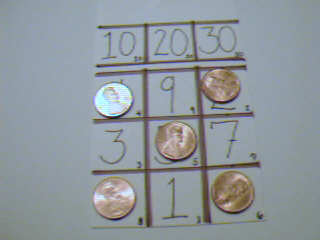
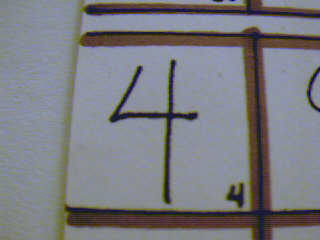
In each square the number is written twice. It should be big and prominent in the middle of the square, but also there should be a small copy of the number in the lower right corner, which is readable even if the center of the square is covered with a penny. Here is an enlarged example of one square. 3.2. Making a board The boards are meant to be used in very early grades, kindergarten through second, but the numbers must be well written and clearly readable, and the whole board should look attractive. Also each child in the class needs one. So the boards must be made by the teacher, or they can be made as a project in a higher grade, and related to the study and design of magic squares. In such a case, using colored index cards and color markers makes the boards more attractive and more individualized, and the task more like an art project. 4. Use of the board Each student needs one board (a transparency to be used by the teacher on an overhead projector is also useful). Each student needs 5 pennies to be used as tokens on the board. 4.1. Initial position We always start with 2, 3, 4, or 5 pennies put on the magic square. The top row is initially empty. Two pennies may be stacked up on one square, but ONLY ONE such stack is allowed. Here are examples of 4 initial positions. The value of each position is the sum of the numbers occupied by the pennies. Two pennies on one position double the number. Thus the values of the positions above are:
The goal of the activity is to compute the value of a given position by picking up two pennies at a time, mentally adding the numbers below them, and putting the sum back on the board. Tens are put in the top row, and ones are put back on the magic square.
Rule 1. Add two numbers in the top row first. Rule 2. If two pennies are on the same square, pick them up immediately and double the number. Rule 3. If the teacher tells you which two pennies to pick up, you must listen; otherwise you may pick up any two pennies. 5. Activities At first the teacher explains what should be done, using an overhead projector. Later she provides instructions verbally, and observes how the children work. The activity below should be done frequently, for a short time, and it should go at a brisk pace, but without rushing. Children work individually. Each child needs a magic square board, 5 pennies, 1 sheet of paper, and a pencil. (1) Each child writes his/her name on the sheet of paper. (2) The teacher tells the initial configuration, for example, "Two pennies on four, one on 6 and one on 2". The teacher may tell the children which addition to perform first (for example, "Add 3 to 8 first"), providing that it does not contradict the second rule above. (3) The children compute the value and write down the answer. Steps (2) and (3) are repeated several times. At the end, the teacher takes up the sheets with the children's work. Remarks (1) If one or two students are lagging behind, tell them to skip the next problem and don't keep the others waiting. It breaks their concentration. (2) Watch for arithmetic errors. They usually indicate some conceptual difficulty. (3) If a student makes many errors, do not give him/her extra practice before you are sure what the problem is. It might just reinforce the errors he/she is making. (4) Watch for answers such as 308 (instead of 38) or 105 (instead of 15). Such errors are typical and must be corrected immediately. (5) Vary the difficulty, but do not wait with hard problems until the students master the easier ones. Some information about the number of configurations.
Lesson Index |
|||