Ancient Knot
|
Introduction
Knots are made with string, ribbon, cord or rope. Mathematicians say that a knot is simply a line entangled with itself. When you tie two pieces of string together, the knot can be untied. If the string is very slippery, you can untie the knot by just pulling the two pieces of string. So usual knots, like a square knot or a granny knot, are held together by the friction of the string. With a slippery string, knots will not stay tied. 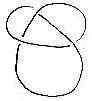 It is different
when the two ends of a single string are fixed together. The string
forms a loop. A knot on such a loop cannot be untied without cutting
the string. The simplest knot on a
loop that cannot be untied without cutting the string is shown at the
left. It is different
when the two ends of a single string are fixed together. The string
forms a loop. A knot on such a loop cannot be untied without cutting
the string. The simplest knot on a
loop that cannot be untied without cutting the string is shown at the
left.
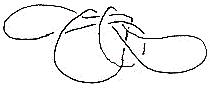 But this knot to the right, even if it
looks very complex, can be untied and the string can be returned to
its simple loop form. But this knot to the right, even if it
looks very complex, can be untied and the string can be returned to
its simple loop form. The art of making knots is ancient. Knots were important in two of the earliest human crafts, basket making and weaving. During the period of sailing ships, all sailors had to know how to tie knots. Some knots were appreciated for their beauty, and magic powers were even attributed to them. Activity 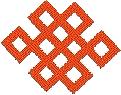 In this lesson
we will learn how to make from stiff paper the very ancient knot shown
here. It has no beginning or end, and according to folklore, it
represents longevity and immortality. In this lesson
we will learn how to make from stiff paper the very ancient knot shown
here. It has no beginning or end, and according to folklore, it
represents longevity and immortality.
1. Make a grid of 1/2" squares on the lined side of the index card. Make tickmarks at 1/2" intervals along all four edges of the card. Draw horizontal and vertical lines across the card, connecting the tickmarks. You will have a grid of 16 X 10 = 160 1/2" squares. 2. You need to make two polygons on the card, each consisting of 33 squares. One polygon is the mirror image of the other. One looks like an s-shape with vertical hooks on its ends, and the other like a backwards s-shape, also with hooks. In order to fit both polygons on your grid you need to turn one 90 degrees. One way to lay them out is shown in the pattern below. 
3. Cut out the two polygons. You may want to color the polygons, as shown in the picture above. Or you may want to exchange one polygon with your neighbor, and make your knot with two colors as shown below. Weave the two polygons together. Glue the overlapping ends so that you have a "continuous" knot. It should look like the picture: 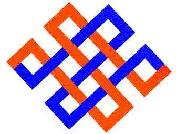
4. Can you make a "continuous" knot that is bigger? For example, the one above has 10 holes in it. Can you make one with more holes? Here are two variations of the Ancient Knot made by students. |