Triangle
to square: A hinged dissection
Background:
Greg Frederickson's book Hinged Dissections: Swinging & Twisting ,
was published in 2002 by Cambridge University Press. We thank him for this
dissection, originally credited to Dudeney in 1907. We have adapted it for use
with children.
From his website, http://www.cs.purdue.edu/homes/gnf/book2.html :
"A geometric dissection is a cutting of a geometric figure into pieces that we can rearrange to form another figure. As visual demonstrations of relationships such as the Pythagorean theorem, dissections have had a surprisingly rich history, reaching back to Arabian mathematicians a millennium ago and Greek mathematicians more than two millennia ago. As mathematical puzzles they enjoyed great popularity a century ago, in newspaper and magazine columns written by the American Sam Loyd and the Englishman Henry Ernest Dudeney. Loyd and Dudeney set as a goal the minimization of the number of pieces. Their puzzles charmed and challenged readers, especially when Dudeney introduced an intriguing variation in his 1907 book The Canterbury Puzzles . After presenting the remarkable 4-piece solution for the dissection of an equilateral triangle to a square, Dudeney wrote: 'I add an illustration showing the puzzle in a rather curious practical form, as it was made in polished mahogany with brass hinges for use by certain audiences. It will be seen that the four pieces form a sort of chain, and that when they are closed up in one direction they form a triangle, and when closed in the other direction they form a square.”
The lesson:
For this lesson we used 9 by 12 inch rectangles of foam rubber, 6 mm thick. The brand was Darice Super Thick Foamies, available at craft shops for about $1.50 per sheet. You may use the 3 mm thick sheets, but they are more difficult to work with. If you are careful (see the diagram below), you can get four triangles with edge length 6 inches from each sheet. The foam rubber can be cut with ordinary scissors.
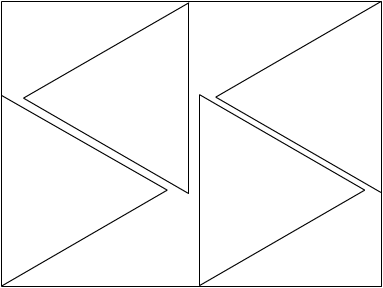
Here is one way to lay out four equilateral triangles with edge lengths six
inches on a 9 by 12 inch sheet of foam rubber:
Preliminary tasks:
From a 9 by 12 inch rectangle of 6 mm thick foam rubber, cut out as many
equilateral triangles with a base of 6 inches as you can. (Let students work on
this using paper triangles on a 9 by 12 inch rectangle made from construction
paper, before they work with the foam rubber! They should draw the triangles
using compass or protractor and ruler, and then cut them out. As shown above,
you can get four such triangles.)
Lay out a pattern for four triangles on your foam rubber. You may draw on the
rubber with a pencil. Now cut out the triangles. Each child should have one
triangle. The goal is to make each one into a hinged object which, when
rearranged, will form a square.
Supplies:
A foam rubber equilateral triangle, 6 inches on a side, scissors, ruler, calculator, compass, index card (to make right angles). Wide strapping tape (optional), to repair your triangle in case you accidentally cut it apart.
Steps one through nine are shown in the animation at the very bottom of this unit!
1. Find the area of your equilateral triangle. It has side length s = 6
inches, and of course base b = 6 inches. So 1/2 of the base is 3 inches. By the
Pythagorean theorem,
(1/2*base)^2 + height^2 = 6^2
Solving for height,
height = √(36
- 9) display: 5.1961524 inches
area of triangle = 1/2 * base * height = 3*5.1961524 = 15.588457 square inches
2. Find the length of the edge of a square with area 15.588457 square
inches:
√(15.588457)
= 3.948222 inches
Changing this number to 3 inches and some number of 16ths of an inch:
[3.948222][-][3][=] .948222
[*][16][=] 15.171552
So the length of the edge of the square is about 3 15/16 inches.
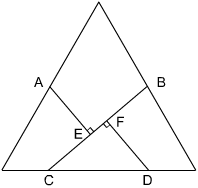
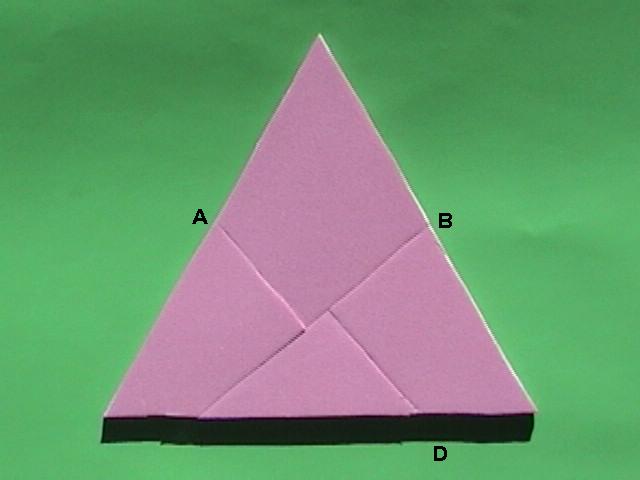
3. Mark the midpoints of two edges of your triangle, say the left and right edges. Call the midpoints A and B. (See illustration.)
4. Set your compass radius at 3 15/16 inches. Put the point of your compass on one of the midpoints that you just marked, say B. Swing an arc and mark a point one radius away on the bottom (unmarked) edge of your triangle. Call this point C. Connect points B and C with a straight line.
5. Set your compass to a radius which is the length from A to B. Put the point of your compass on C, and swing an arc that cuts the bottom edge of the triangle. Call this point D.
6. Now using an index card, construct a segment that goes through point A and is perpendicular to line BC, ending on line BC. Call the point E where the line intersects BC.
7. Construct a second line segment that goes through point D and is
perpendicular to line BC. Name the point F where the line intersects line BC.
Your triangle should look like this:
8. Be sure that all the lines above are drawn on your triangle. You are now
ready to cut. This needs to be done very carefully.
Beginning at C, cut along line CB ALMOST to B. Do NOT cut through to B!
Beginning at E, cut along EA ALMOST to A. Do NOT cut through to A!
Beginning at F, Cut along line FD ALMOST to D. Do NOT cut through to D!
You have created hinges at A, B, and D:
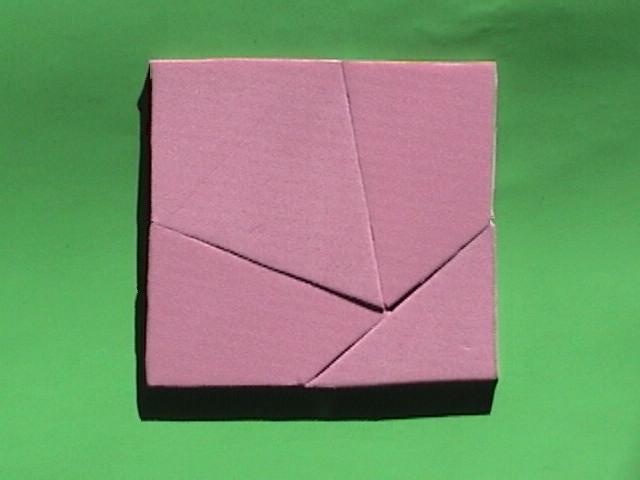
9. Now swing the pieces around to form a square!
![]()
Now we have a triangle to square!